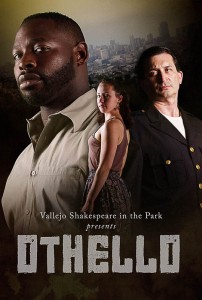
Promotional Photography for “Othello”
Vallejo Shakespeare in the Park will be presenting “Othello” this summer and I had the opportunity to create some promo photographs for their show. The main differences with the promotional photography and production photography is that with the promo stuff, I light and pose the actors. With production photos, I’m basically a fly on the wall during a dress rehearsal–commonly during tech week, and more commonly during the very last dress rehearsal before a show opens–when the show is picture ready.
Theatre companies need the promo pictures well before a show opens so they can (you guessed it) promote the show with plenty of time before it opens. This is especially important because prospective audience members are more likely to go see a show if they have a way connect with the characters beforehand.
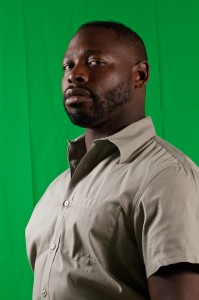
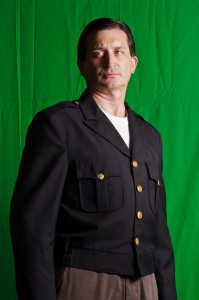
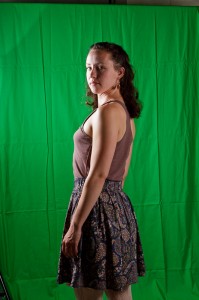
For the shot(s) above, I shot the actors separately against a green screen, lit them with small flashes with shoot-through umbrella attachments, and created a composite in Photoshop. I went into the shoot with a firm concept of what the final product was going to be, so I lit and posed each actor accordingly.
For Othello, I knew I wanted to bring out the contours of his face and create depth with strong shadows, so I placed my main light camera left at a hard 90 degree angle towards the subject, which fills in his face but also casts a distinct shadow to the right of the camera. I then placed a fill light at a 45 degree angle camera right. This gave me a face that was well lit, and shows us exactly what Othello looks like, but it’s not flat and evenly lit.
For Iago, I wanted his face more filled in, but with one side more “lost” in shadow–almost as if he was being obscured by Othello’s shadow. I placed the key light 45 degrees camera right and angled his face just so that one side was almost completely obscured except for his eye–people always focus on the eyes, so I didn’t want to lose it. I had one more light behind and above him to give his hair a little depth, but I didn’t want a classic back/rim light scenario–just a tiny splash of light on his hair.
Finally, I wanted to give Desdemona the same light/shadow depth that I gave Othello. I had to walk the lights back a couple of feet since I shot a bit wider to get more body length. Due to the way she was posed, I noticed that the fill light being at 45 degrees was hitting her flat against her back, and the contours of her arm seemed to get lost, so both the main and fill light were placed 90 degrees on either side of the frame.
I took these shots using the Canon EOS 7D with the ST-E2 Speedlite Transmitter
attachment. Even though the 7D features wireless flash control built in, there’s less digging into menus when I use the ST-E2. I used three 430EX II flashes on light stands, two of them with umbrellas.
After the shoot, I went through the usual workflow of Photo Mechanic > Lightroom > Photoshop to create the final composite image you see at the beginning of the post. Lots of fun, and more planning and post-production involved than a dress rehearsal shoot, but the end result was really worth it. One thing I regret is not capturing behind the scenes photos of the lighting setups themselves. Because of limited budgets, I didn’t have an assistant on this shoot so all the lightstand moving was done by yours truly. Hopefully next time I’ll have a bit more time to do so.
Make sure to check out the event here: http://www.facebook.com/event.php?eid=123487851078062
Posted in Hardware, Lighting, Photography, Portfolio, Portraits, Promotion, Technical, Technique, Technology, Theater, Workflow No Comments »
